
Metamask is one of the most recent tools that are successfully laying the ground for mainstream adoption of cryptocurrencies by providing a simplified way of accessing blockchain technology to the average internet user.
The Metamask wallet allows you to carry out transactions involving Ethereum’s cryptocurrency (Ether) as well as go the extra mile to let you explore Ethereum’s blockchain on a standard internet browser.
This guide and review purposes provide you with all the information you need to get started with the application.
We will commence the Metamask review by defining what the application is all about, then proceed to the installation process, use and features in light of security and safety.
What is Metamask?

Metamask is, in a nutshell, a crypto wallet that allows you to store your crypto coins. With this product, you will be able to store and transact Ethereum tokens (ERC-20) as well as any other Ethereum-based cryptocurrency. In addition, more and more blockchains will be added to the list of supported protocols gradually, such as BSC.
The wallet can be added to Chrome or Firefox as an extension. There is no need to register or log in for this type of extension; rather, it is downloaded and added as an extension. For the convenience of its users, this service is also now available as a mobile application for Android and iPhone devices starting in September 2020.
This feature stores your private key locally on your computer, within the browser data in particular, where Metamask encrypts your data. In terms of security, this is a major improvement, but if someone managed to access your PC and get the key, it is still possible to steal your cryptocurrencies. If you want to be safe, the only option you have is a hardware wallet like Ledger or a paper wallet. However, this option is not convenient for frequent usage.
Metamask can, in fact, connect to a hardware wallet like Trezor or Ledger and vice versa. I believe this is the ideal combination of security and functionality – 100% security combined with Metamask’s flexibility.
How to Install MetaMask Wallet?
The following steps explain how to use the MetaMask wallet inside a web browser.
- Go to the MetaMask website by clicking here.
- On the next page, click the Install MetaMask button under the name of your browser.
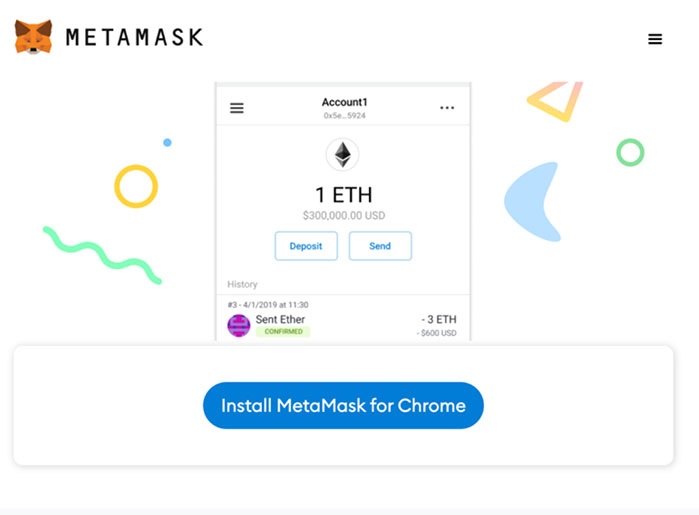
- From there, you should follow the instructions that are specific to your browser. For Chrome, you will need to click on Add to Chrome before adding the extension.
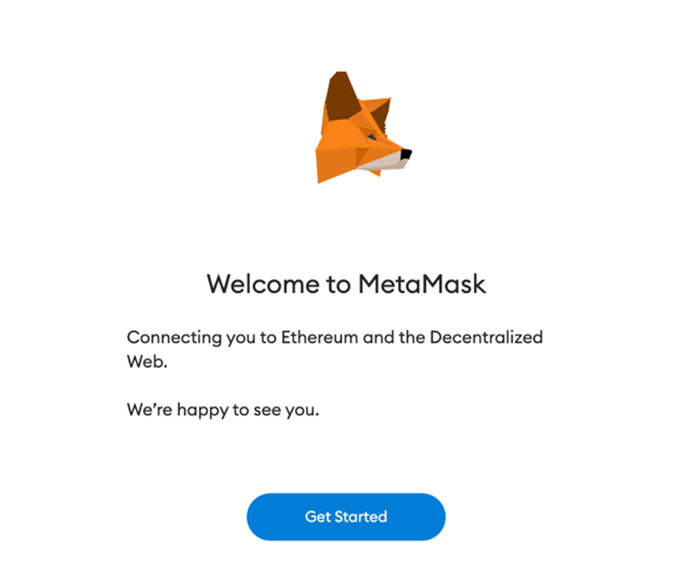
- You will then be taken to the MetaMask tab, where you will have to click Get Started.
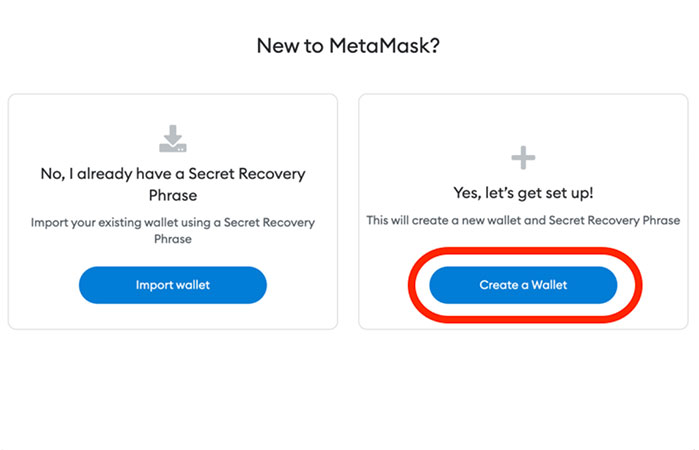
- When you are not already logged into your wallet, click on Create a Wallet if you don’t have one.
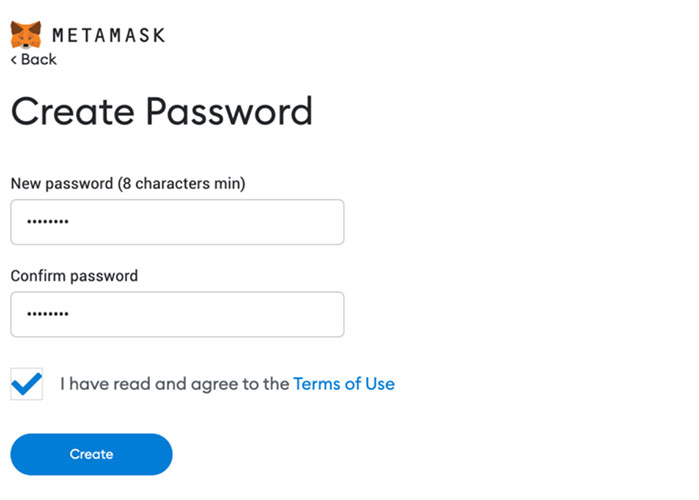
- Select whether to give MetaMask usage data in order to provide you with the best experience.
- Click on Create after you have chosen a password, entered it twice, and accepted the agreement.
- MetaMask will now create your recovery phrase, or mnemonic, which is also known as your secret phrase. It is a very important matter for you to keep this phrase secret.
- It is important that you write down the Secret Words you will be given when you click CLICK HERE TO REVEAL SECRET WORDS.
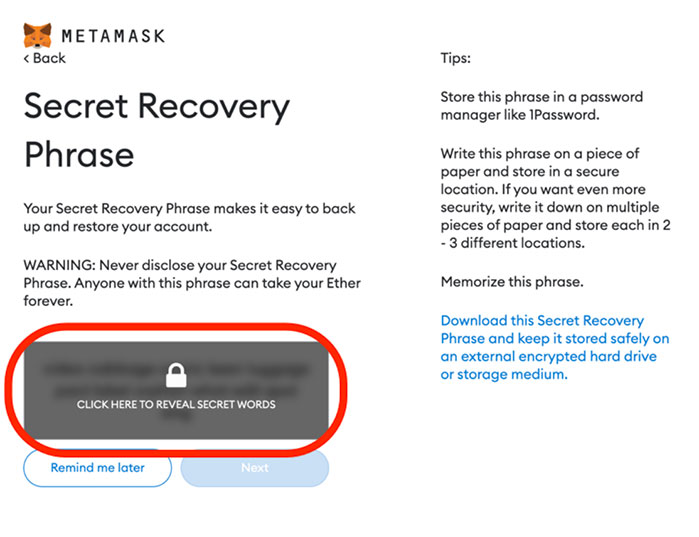
- Next, click Continue.
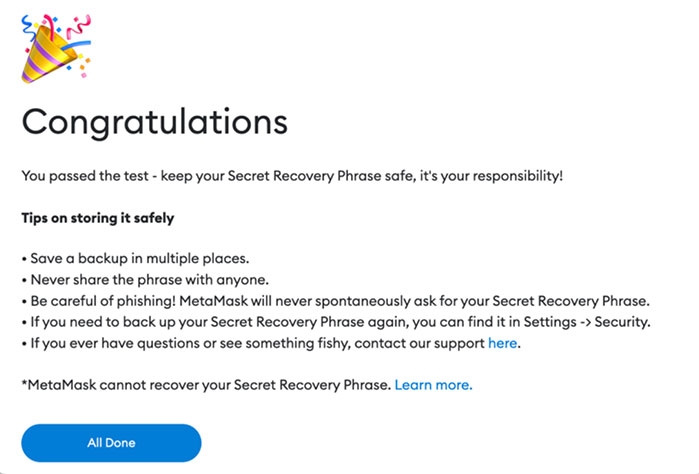
- By clicking the words in the correct order and then clicking the Confirm button, you can demonstrate to MetaMask that you have a copy of your secret recovery phrase.
- Finally, click the All Done button.
Send and Receive Tokens in MetaMask
With MetaMask, sending and receiving tokens is also known as withdrawing and storing them. You need to follow some steps in order to accomplish these actions.
Receiving token in MetaMask (Deposit)
The easiest way to put ETH or ERC-20 tokens in your MetaMask wallet is to submit a transaction pointed to the address of an account that you have in MetaMask, so you simply point the transaction at the MetaMask wallet address.
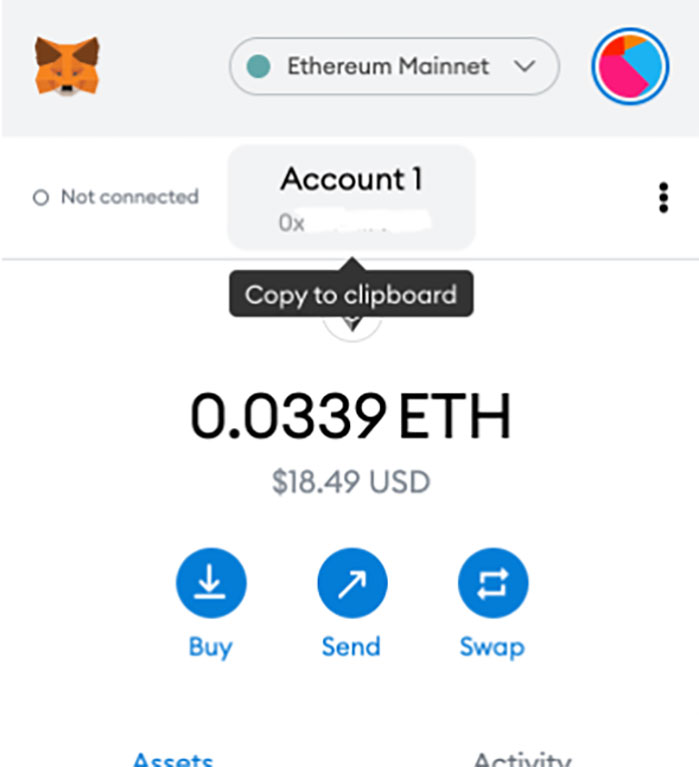
- When MetaMask opens, go to the top of the window and hover over the name of the account you want to access. You will see an option named ‘Copy to clipboard‘ appear to the right. Simply click the button to get a copy of the address to which you are sending your Ethereum or other tokens. You will be prompted to enter your address as the recipient field. If someone else is sending you tokens, you can share your address with them.
- In addition to selecting the amount you want to send, you will also need to follow any other necessary steps in the sender application to complete and send your transaction.
There are some important points to consider when depositing into MetaMask. You should be careful about them to prevent asset losses and successful deposit.
If you’re attempting to transfer tokens, you need to verify that the token you are sending is compatible with the network you’re trying to use. It is possible, for instance, that you are sending Polygon-native MATIC to your MetaMask when it is more appropriate to send ERC-20 MATIC. If you are attempting to send a token using an address that is incompatible with the token you are sending, the exchange will usually recognize this and prevent your transaction from proceeding. However, you should still take caution.
In the case of an application that holds your tokens, the process for sending tokens may be different, depending on the application. Consequently, it is recommended that in order to transfer tokens from their application, you read their documentation or contact their support team for additional assistance.
If the transaction is successful, the balance in your MetaMask account should be updated once the transaction is completed. Occasionally, you may observe that the balance on your wallet does not update, and you may need to check the status of your transaction on a block explorer such as Etherscan by searching for the txHash (transaction hash) of the transaction that you just submitted.
Sending token from MetaMask (Withdraw)
Following are the steps that will guide you through sending ETH and other blockchain tokens that conform to the ERC-20 standard. Regardless of the network you’re using. The process is basically the same – the only requirement is that you have enough of the native token of the network to pay for the transaction.
If you would like to send ETH from MetaMask, you need the Ethereum wallet address of the recipient, as well as a sufficient balance in your MetaMask account of the selected network token (for example, Ethereum for the Ethereum blockchain, Binance Smart Chain for the Binance Chain, etc.).
- You’ll need to click the Assets tab, then the token you’d like to send.
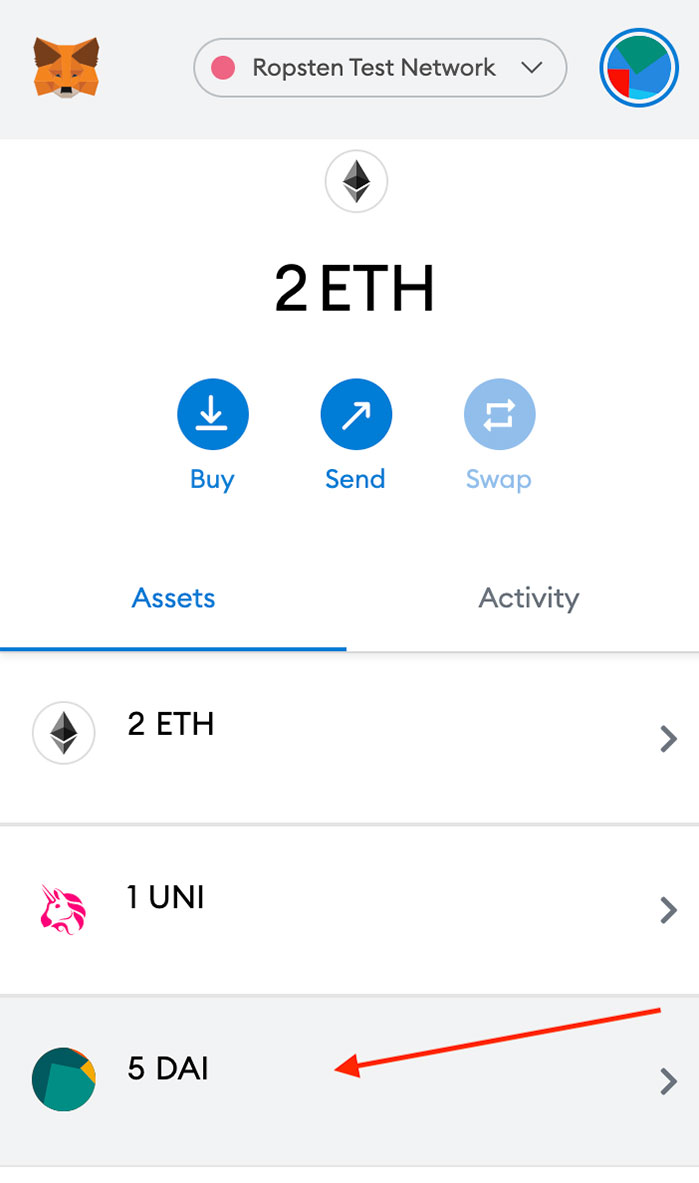
- When the main page for the token appears, click Send.
- If you want to transfer to another wallet, you will need to paste the wallet address of the recipient in the Add Recipient field OR select the option of transferring between your wallets. Don’t forget that Ethereum Name Service (ENS) is not supported by MetaMask.
- The Amount field is where you will need to enter the amount of the token you wish to send.
- Depending upon your preference, you can increase or decrease the price of gas. To give you an example, you could use the Eth gas station as a reference.
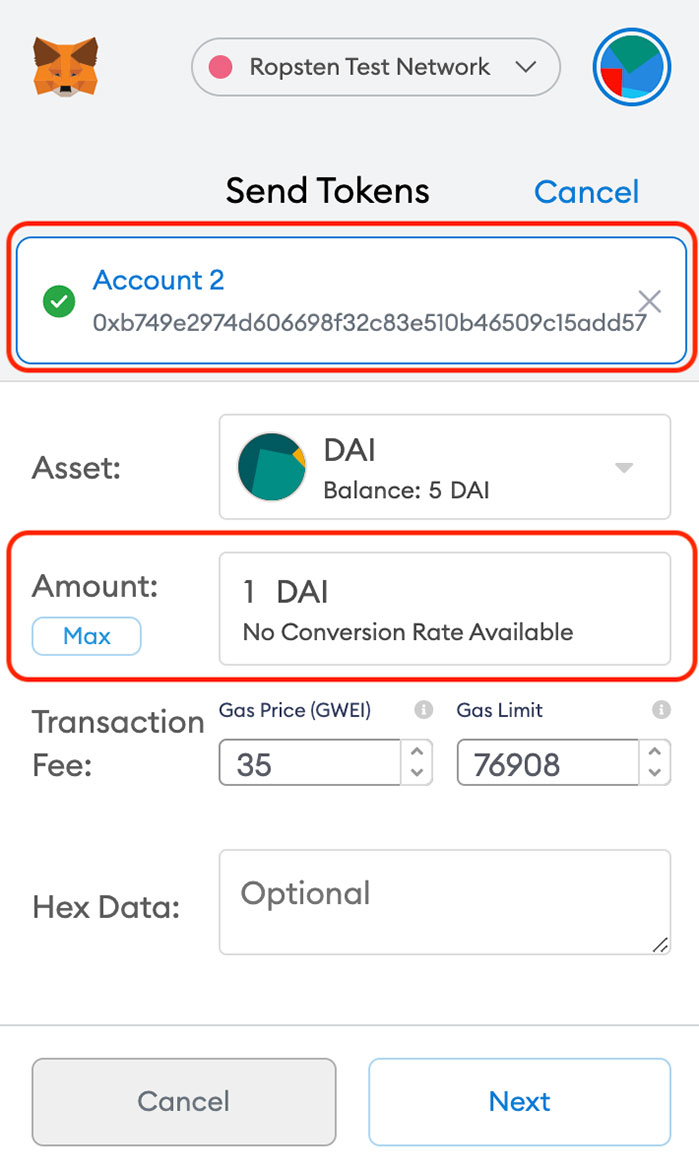
- The address of the recipient is a very important factor to check before you click on Next in order to proceed with the transaction.
- After carefully reviewing the transaction details, click Confirm to confirm the transaction.
- As soon as you complete the check-out process, you will be redirected back to the main page, where you can find a list of your recently dilated funds on the Activity page.
It is important to keep in mind some points in this regard as well. On successful completion of the transaction, you will be able to see the updated token and ETH balances, and also the entry “Confirmed” will show up on the transaction page.
In the Activity tab of MetaMask, clicking on a transaction will display information about the transaction. When clicked, you can also choose to view the transaction record by using a network’s block explorer such as Etherscan, BscScan, or Polygonscan.
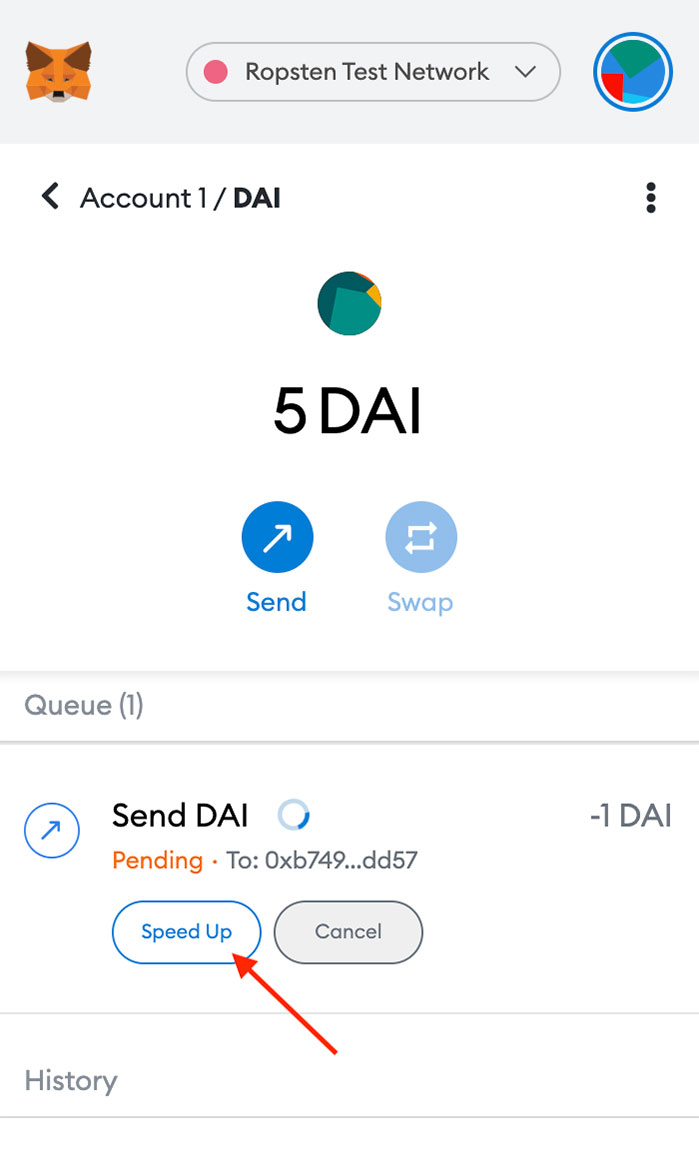
Occasionally, it is possible that your transaction will not be confirmed for a long period of time. If that occurs, you can either Speed Up the transaction by submitting a second pending transaction that contains a higher gas price or cancels the transaction before it is confirmed; this is available should the first pending transaction slow down.
There is no difference in how this works for ETH as it does for other ERC-20 tokens when sending them, but always make sure that the wallet that receives them is able to accept the ERC-20 tokens that you’re sending.
Swap Tokens in MetaMask Wallet
If you want to swap one crypto token for another on MetaMask, the Swap feature provides exactly that: it allows you to swap one crypto token for another. In terms of convenience, it is extremely straightforward and reduces the number of steps and exposure to third-party smart contracts that are needed in order to acquire tokens that you may be interested in.
In spite of a token conforming to the ERC-20 standard, it is still advisable to do some research on the token before you buy it or obtain it. Cryptocurrencies and decentralized finance are novel in the sense that their programmatic nature has made them.
A token isn’t necessarily static; it may have functions that can affect the way in which it is used or how it affects your wallet. There are, however, a few less malignant caveats to this: for instance, you can acquire some tokens when they’re available, but in order to gain the utility intended from them, you need to stake them on a specific platform.
Depending on the price you click on and the final transaction price, slippage is the change in price between your click and the final transaction price. With decentralized finance and cryptocurrencies being highly liquid and fluctuating, prices can change from moment to moment. In order to ensure the transaction actually goes through, Swaps are built so that there is some difference between the price you agree upon and the final price–but not too much, so that you are not impacted by sudden spikes or drops in price.
A custom token is what MetaMask refers to as a token that doesn’t belong in MetaMask’s standard list of tokens since these tokens are not so common or widespread. Try adding the tokens manually in the event that you swapped some tokens into your wallet but did not see them (after a few minutes, please remember blockchain is fast, but it isn’t instantaneous).
- Getting the tokens you want is as easy as a few clicks or a few taps, regardless of whether you’re using the MetaMask Extension or Mobile.
- You will find a rectangular button with several arrows in a rectangular shape on the main screen of the MetaMask Application. This button will be marked ‘Swap.’ All you have to do is press it!
- On the main Swap screen, you will find the main menu.
- The first step is to choose your token from the drop-down list at the top of the page and confirm that you are willing to ‘spend’ it.
- By selecting the token from the second drop-down menu, we will be able to select the token we’re interested in acquiring.
- As you adjust the value of the first token up or down, you will have a better idea of the amount of money spent and the amount you will acquire as a result.
- You can get quotes by clicking “Get quotes” at the bottom of the screen. Simply press the button!
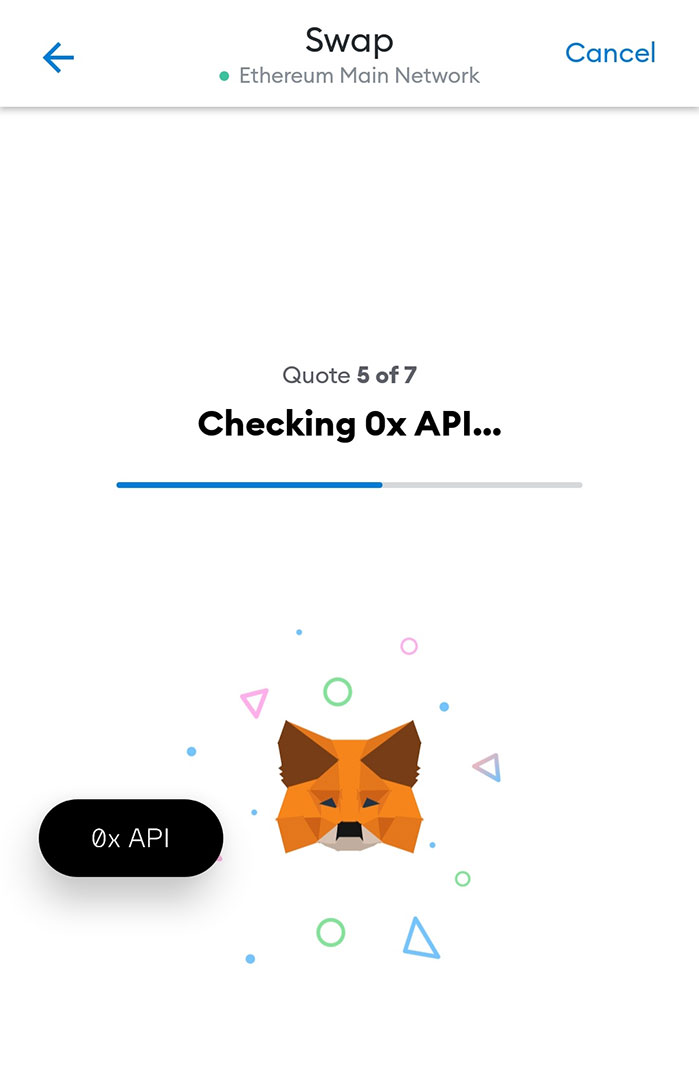
As soon as you open the app, you will be able to see the process the app goes through to search for the best price. It is this process that gives MetaMask Swaps the edge over all other swapping services in terms of price and quality. Watching Swaps searches, you will notice that there are a lot of things happening behind the scenes.
Swaps are first looking at and comparing the exchange rates offered by decentralized token exchanges and token swapping protocols all over the world in order to find the best exchange rate for you.
While running the test transaction, it also checks to make sure that if you end up submitting a transaction, it has a reasonable chance of going through–and if it does not, those options are removed from your list. In this case, MetaMask users are being spared the pain of an incomprehensible error code and the associated gas fees on Ethereum’s mainnet: with Ethereum mainnet fees and the complexity of smart token contracts, a failed transaction comes with a financial injury added to the insult of an incomprehensible error code. The exchange has a very low failure rate, which is being worked on to make it nearly nonexistent in the future.
There are a few keen-eyed users out there who notice that on the previous screen, toward the bottom left of the screen, there is a small mention of the term “3% slippage”. As mentioned above, the slippage is yet another parameter that Swaps employs to your benefit.
At the top of the screen, the most important information is displayed: the number of tokens you will acquire at the conclusion of the last quote (keeping the slippage in mind). In addition to offering you detailed information about the quote, you also have the option to view how it was calculated and to set advanced gas settings if you wish. This is a whole separate topic on its own, but that is the amount the network will fork over to MetaMask on top of it.
Just swipe that Swap swiper across the screen if you are ready to go!
The transaction will not be instantaneous due to blockchain technology, but you should see your tokens in your wallet in the next few minutes or hours.
Therefore, MetaMask swaps work on all networks, so you can use them on any network. For example, swaps can be used on Polygon, even if you are not on the Ethereum mainnet.
The swap functionality of ERC20 Coin allows you to trade tokens right from your wallet, directly over any Ethereum compatible network without interfacing directly with a third-party platform, thus decreasing your risk of exposure to hackable or non-functional smart contracts.
How to Export Private Keys in MetaMask?
If you have access to the private key of an Ethereum account, you can use that key to import it into any wallet that supports Ethereum. It is natural for you to have to locate the private key first within MetaMask before you can import the account elsewhere via private key.
The export of private keys to an account should be done with extreme caution. If you export your account, you could be displaying your private key in clear text, which may be a security risk. It would be wise to take care while retrieving your private key that no one else sees or has the ability to capture a screenshot in order to avoid losing funds in the future. A large number of phishing campaigns attempt to eavesdrop on you by asking for your private key. The MetaMask team will never ask for your private key, and you should never share it with anyone. The MetaMask Support team will never ask you for your private key, regardless of the context in which the request was made. You should assume that anyone asking for your private key is trying to scam you, so do not hand it over to them.
In this step, you will learn how to export your private keys for backup or how to import your private keys into a new account.
- Click on the icon to open the identical
- From there, select the account you would like to export
- When you go to the Account page, click the three dots at the top-right corner of the page to open a menu.
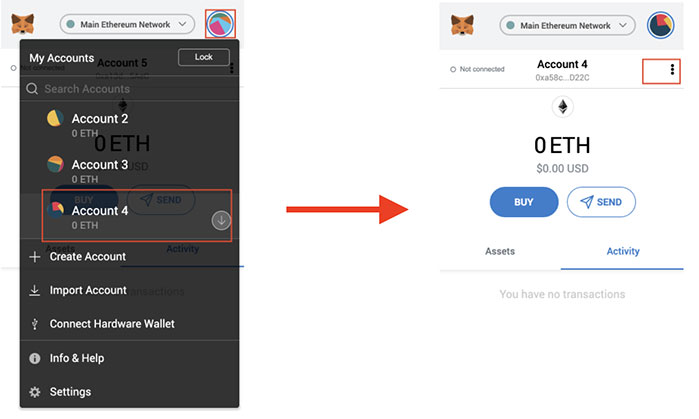
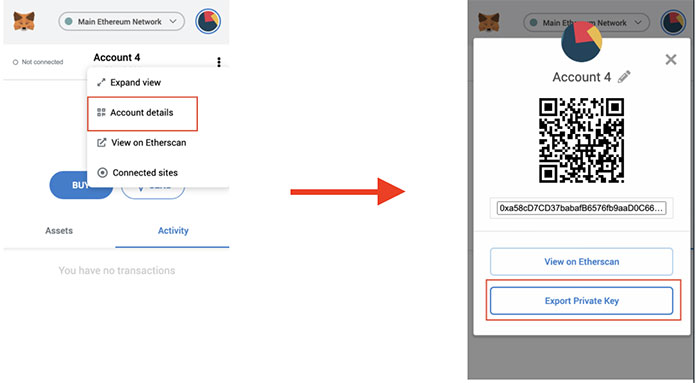
- Click the “Account Details” link to view the details of your account.
- Then click “Export Private Key“.
- Enter your password and click “Confirm” to export your private key.
- You now have access to your private key. Make sure it is copied somewhere safe and stored there.
- You can close the screen by clicking “Done.”.
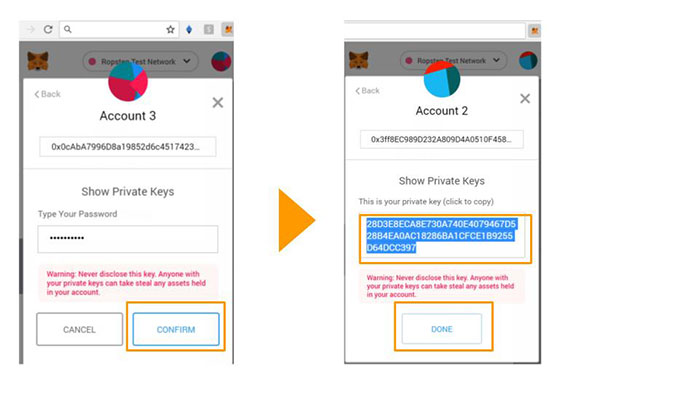
Please ensure that you never share this key with anyone because if you do, you can compromise your account and have it locked.
How to Add New Tokens to MetaMask?
There are a large number of options for dealing with tokens in MetaMask, and they are the heart of this wallet.
On the MetaMask account page, you can normally see all the ERC-20 standard tokens (or standard tokens) you own. With the proliferation of tokens on blockchain systems like Ethereum and other platforms, MetaMask is unable to keep an authoritative list of tokens governed by the ERC-20 standard–but you can add any token you own that is compliant with the standard.
The process of adding unlisted tokens to your MetaMask wallet can be accomplished in two different ways. There are a few advanced features available to you. For example, a feature that automatically finds tokens held by your address and adds them to your wallet when they are found.
The token list will be aggregated from different token lists available that are being maintained by community members. MetaMask does not maintain a list of ‘accepted’ tokens or ‘valid’ tokens. It is also important to remember if you choose to go this route, that you have to be cautious whenever you encounter an unfamiliar token.
If you’re unfamiliar with a website and would like to use your wallet, do not connect your wallet to it; you have not researched it and have no reason to believe it is trustworthy.
Don’t trust an airdropped token or a token you haven’t seen before. Always do your homework before interfacing with any unfamiliar token or cryptocurrency.
You will see an error message on the block explorer indicating your transaction failed, and you will be directed to a phishing site pointing to the error message, which is an indication that the issue is a scam. DO NOT click that link.
The best thing that you can do to protect your money is to stay aware of the ways in which scammers try to steal it. You have to understand that the online information that you see around the web might not always have sufficient safeguards in place to be worth your trust.
When it comes to adding tokens to your wallet, the second way is to manually add them. If you don’t want to use the automatic mechanism or if your token is less common and has not yet been recognized by the community, you can manually add it to your wallet.
The user needs to enable automatic token detection before it works. There are only a few simple steps involved. The first thing you should do is click on the icon in the upper right-hand corner, then select ‘Settings,’ followed by ‘Experimental,’ and make sure that the toggle is turned on:
For manually adding tokens to MetaMask, follow the steps.
- By clicking the Assets tab, you will be able to see your tokens. Under this tab, you will be able to see your tokens. To import a token, click on ‘Import token’ at the bottom, and if they aren’t being picked up by automatic token detection, then click on ‘View token.’
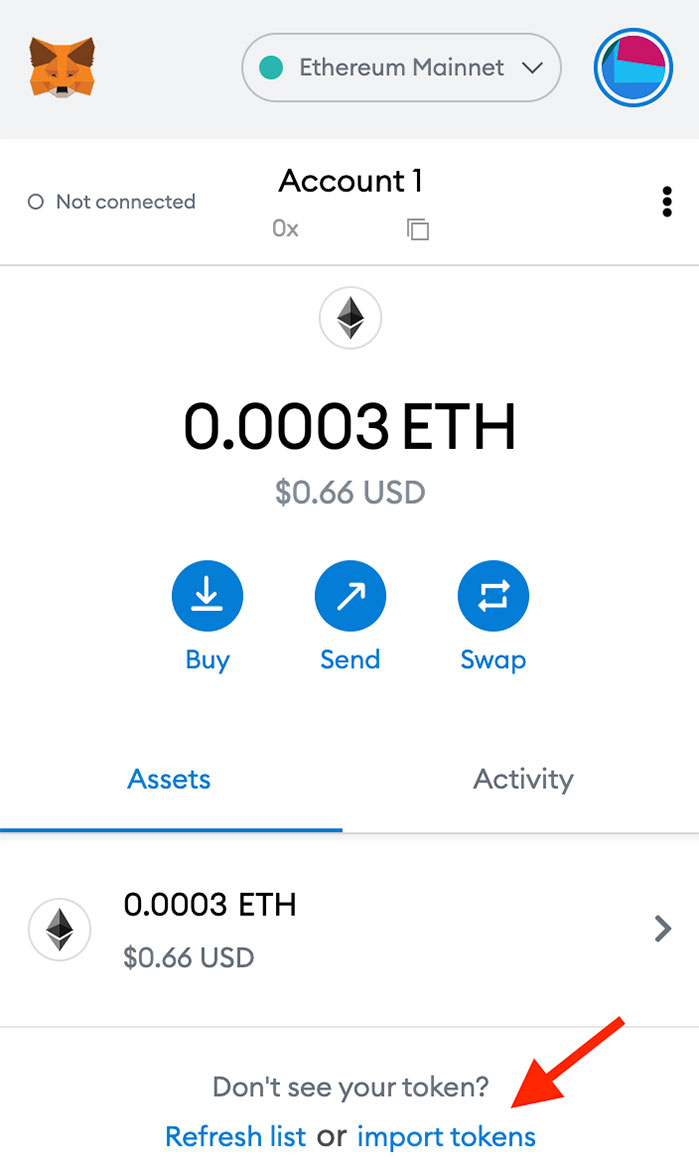
- When you click on the link below, a search box will appear:
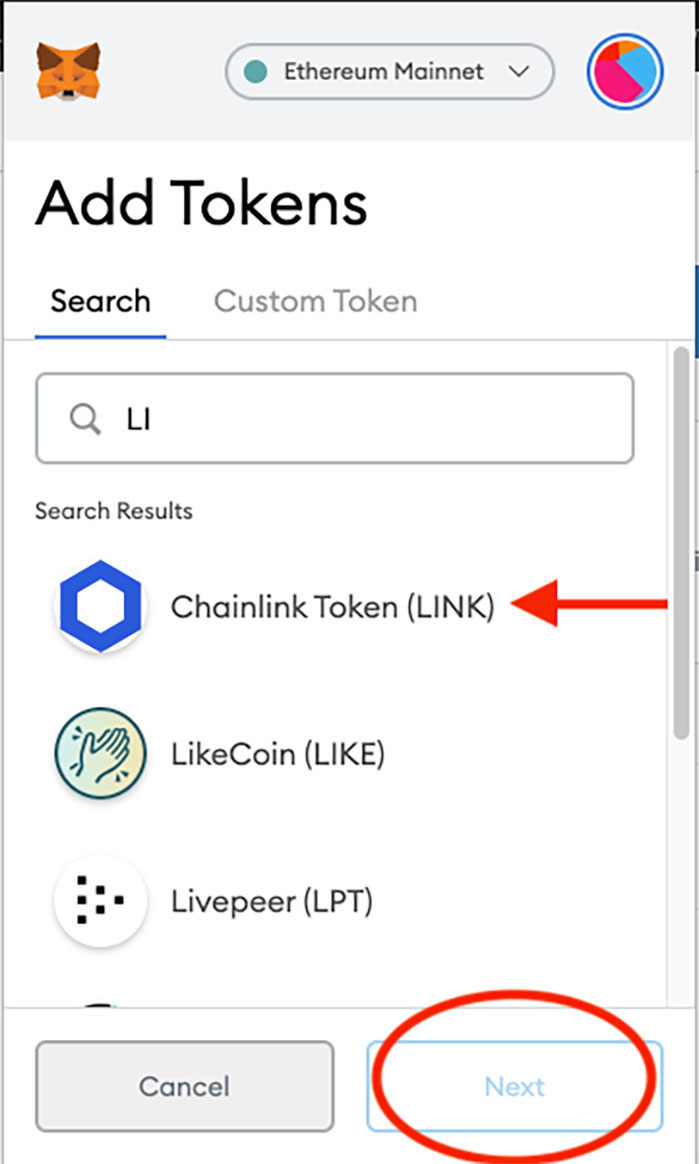
- All you need to do is enter the word(s) found within the token you would like to search for. In the case of Uniswap (UNI), for example, I would simply type the letter “UN” in the search box, and the search bar would provide all the suggestions possible.
- Once you have chosen your token of interest, you need to click Next to proceed (the border of the button will turn blue as soon as you have selected your token).
- You will then be redirected to your account page, where you will find the token you have just added to the list. Click on add token to continue.
For adding custom tokens, follow the steps below:
- Upon landing on the ‘Assets’ tab of your wallet homepage, click on the ‘Import tokens’ button at the bottom.

- Enter the address of the token you want in the first field of the ‘Custom token’ tab at the top of the page.
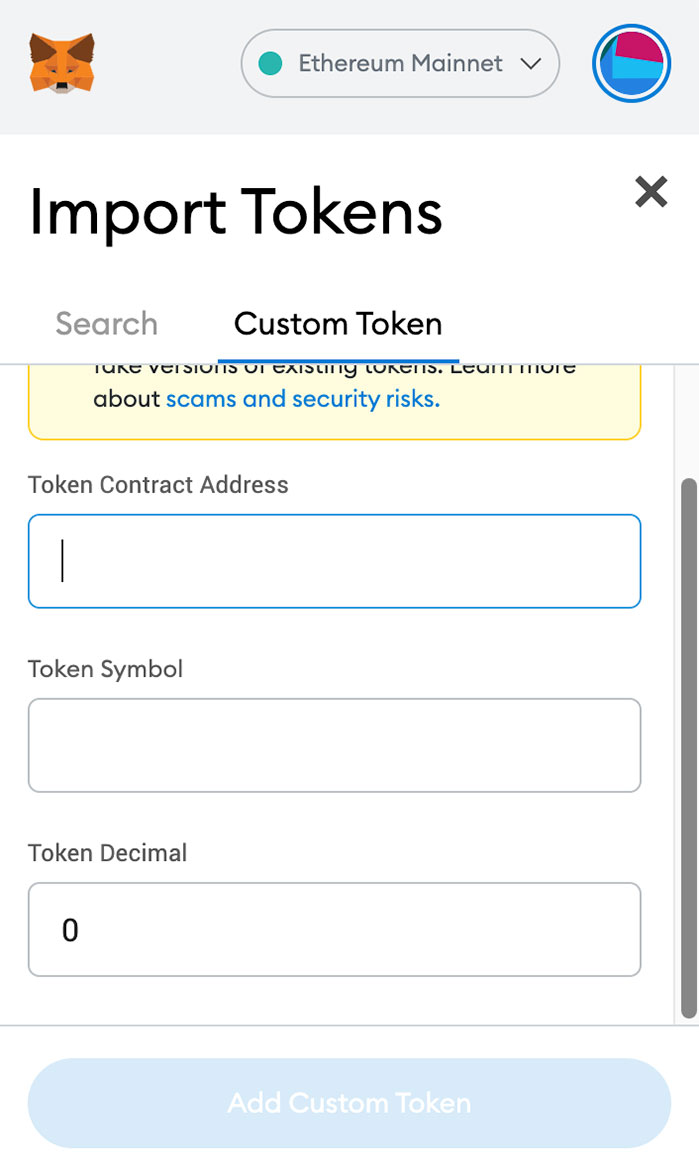
- You will find that most of the time, the token symbol and its decimal value will be auto-filled.
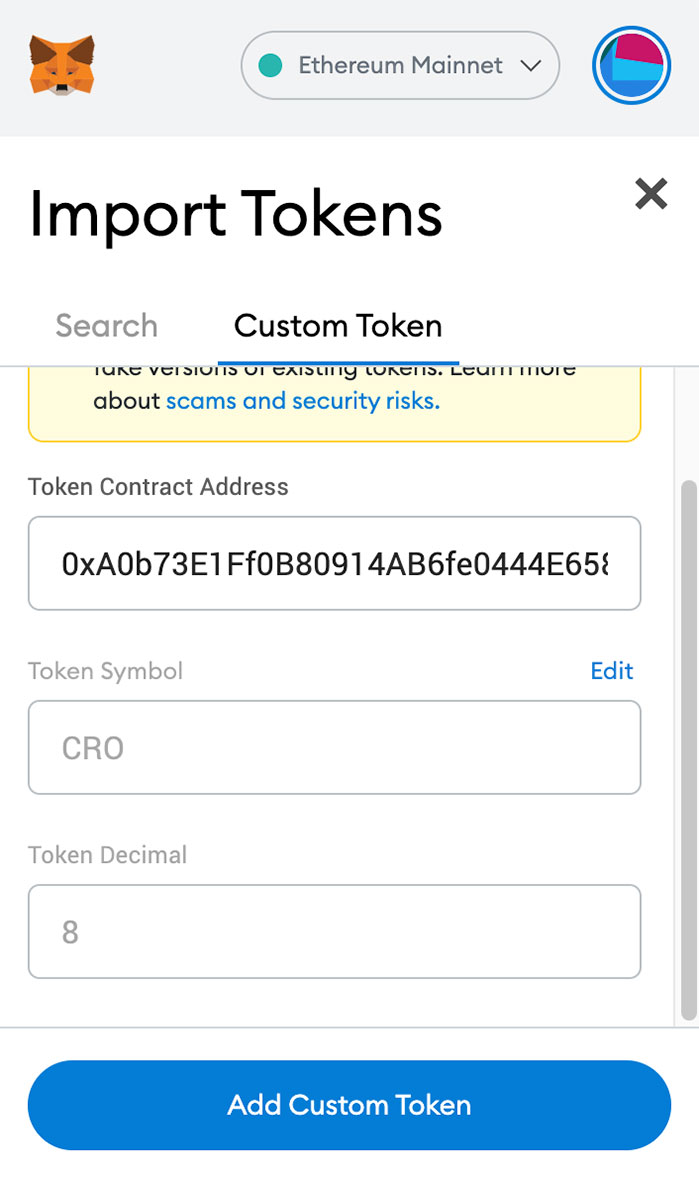
- If they do not, you will need to access the network’s block explorer and look for the token there instead. It is likely you will see the token symbol and decimal values there.

- In the event that you still cannot locate the token details after performing a web search, it is advised that you locate the documentation of the token.
- In order to do this, you will need to click on the button ‘Add Custom Token.’
- A page is now displayed, and you will be asked to confirm if you want to add this token.

- You will be able to add any token type into your wallet as soon as you click the ‘Import Tokens’ button.
Is MetaMask a Trusted Wallet?
MetaMask greatly relies on the anonymity of its users as a means to accomplish its security objectives rather than traditional security measures. MetaMask does not store any user information because it is non-custodial software.
A user-generated password is used to initiate wallet creation, biometric data on mobile devices for authentication, and secure a 12-word seed phrase in order to restore the wallet. The technical support service cannot be reached for help in recovering a user’s password, meaning that they are even more likely to use the seed phrase. It is important for every user to realize that if they lose their seed phrase, they could lose access to their wallet forever.
Because all wallets can only be recovered in two ways across multiple devices, MetaMask is also vulnerable to hacks, malware like Trojans, social engineering attacks, and other crypto scams because there are only two ways to recover a particular wallet across multiple devices. There is a wide range of different ways that hackers try to gain entry to your MetaMask wallet. The most common methods include viruses sent via a phishing site, offering your 12-word seed phrase to another party, or installing a fake Extension to have the hacker control your wallet. MetaMask strongly advises users not to disclose their seed phrase to anyone they do not know and trust and to contact customer service immediately if they do believe their MetaMask wallet has been attacked.
Conclusion
The MetaMask platform allows developers to build dApps on top of the Ethereum blockchain and interact with decentralized applications (dApps) in a simple and flexible way. MetaMask is expanding beyond Ethereum in order to give users a broader collection of decentralized services on the internet. By incorporating Binance Smart Chain and other famous blockchains into MetaMask, the MetaMask team is accelerating the growth of a more decentralized internet that passes Ethereum’s limitations.